Install SSL Certificate on WordPress Website - Step by Step Guide
WordPress Platform is very famous but has its own downsides which lead to major security concerns that need to be tackled. One way of doing that is by install SSL certificate on WordPress. Over 35% of all websites run on WordPress, which highlights the large market share that this open-source content management system (CMS) has acquired. Its beginner-friendly interface and easy controls make it one of the most sought-after platforms to manage websites.
By choosing the right type of SSL Certificate, you not only boost the security of your website but also earn your customer’s trust. Besides that, SSL Certificates also improve your search engine rankings, which is clear from Google’s statement. Basically, this measure was taken to encourage website owners to install SSL certificates. As doing this enables the HTTPS protocol, it ensures the safety of internet users across the globe.
Installing an SSL certificate encrypts all the data exchanged between the server and the client computers, which lets you comply with key requirements laid down under several data privacy and data security laws and regulations. For instance, the PCI DSS lays down installing SSL Certificates as a mandatory requirement for websites that accept online payments. So, if you own a professional website or eCommerce store that falls under that category, then here’s all you need to know about installing SSL Certificate on your WordPress website.
Step-by-Step Guide to Install SSL Certificate on WordPress Site
The first and foremost step involved in installing SSL Certificate is choosing the type of SSL Certificate your business needs. You need to decide this based upon the kind of business you run and the number of domains and subdomains that you wish to secure. Once you have made your choice, then consider purchasing one from a reliable SSL Certificate provider.
1. Choose the right SSL Certificate for WordPress Website
You must choose an SSL Certificate based on your business type and the kind of validation your business requires. Also, you must take into account the number of domains and subdomains you wish to encrypt with that SSL certificate. Let us now evaluate the suitability of the various types of SSL Certificates available.
-
Domain Validation SSL Certificate
If you run a professional website or a blog, then using the Domain Validation (DV) Certificate should suffice your needs.
-
Organization Validation SSL Certificate
Best suited for online businesses and other small businesses. Here, the Certifying Authority verifies the existence of the organization.
-
Extended Validation SSL Certificate
Best suited for online businesses that wish to establish more credibility. Here, the Certifying Authority verifies the existence of the organization, its ownership, legal existence, and more.
SSL Certificates can be further classified based on the number of domains and subdomains that they encrypt.
- Single-Domain SSL Certificate for one domain.
- Multi-Domain SSL / SAN Certificate Certificate for multiple domains.
- Wildcard SSL Certificate for a single domain and its unlimited subdomains.
Once you have determined the type of SSL Certificate you wish to install, then its time to move forward to know steps to install SSL certificate on a WordPress website.
2. Installing SSL Certificate on Server using cPanel
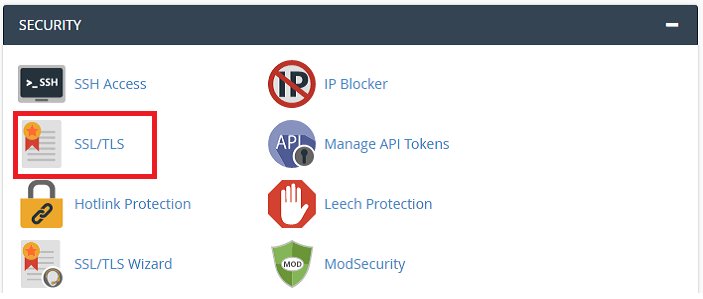
You can install the SSL certificate on the server by logging into your web hosting control panel. From cPanel Home Page, click on SSL/TLS option found in the Security section and you will have a page where you can manage private key, CSR, certificates.
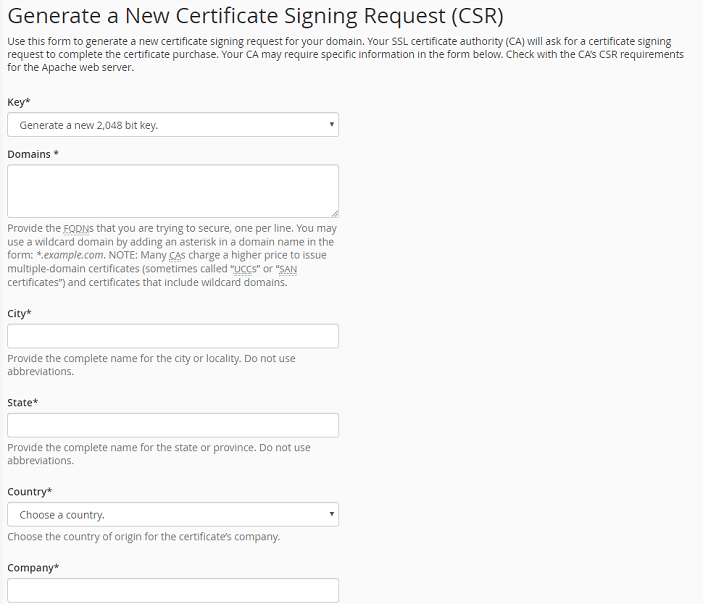
Step 1 - Generate CSR Key
- Choose ‘Generate View, upload, or delete’ option fromSSL certificate signing requests.
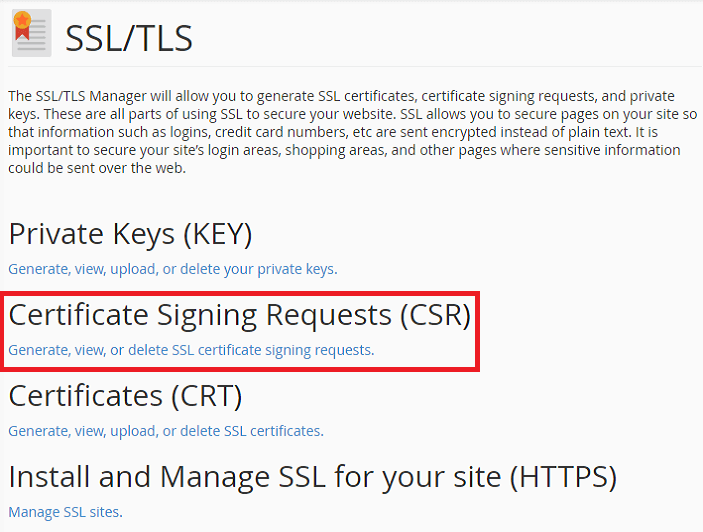
- Fill the form and click on ‘Generate’ button. cPanel will automatically create private key.
- Copy the generated CSR code.
Step 2 - Request to Issue an SSL Certificate
- After generating CSR, submit CSR to your SSL provider for further process.
Step 3 - Install the SSL Certificate on your Server through cPanel
- Once the validation process is over, the certificate authority issues a certificate and CA Bundle in the Zip file and sent to you via email. You need to download and extract that file
- Again login into cPanel.
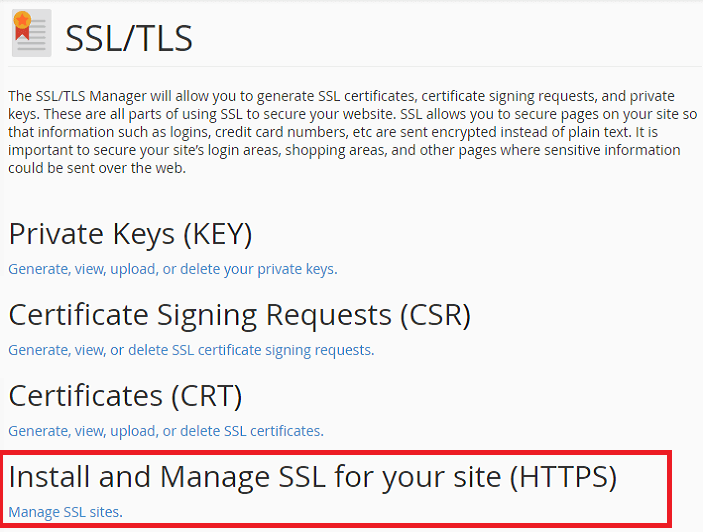
- On cPanel Dashboard, you need to click on SSL/TLS button from Security.
- Choose ’Install and manage SSL for your site (HTTPS)’.
- Select the required domain name from drop-down list.
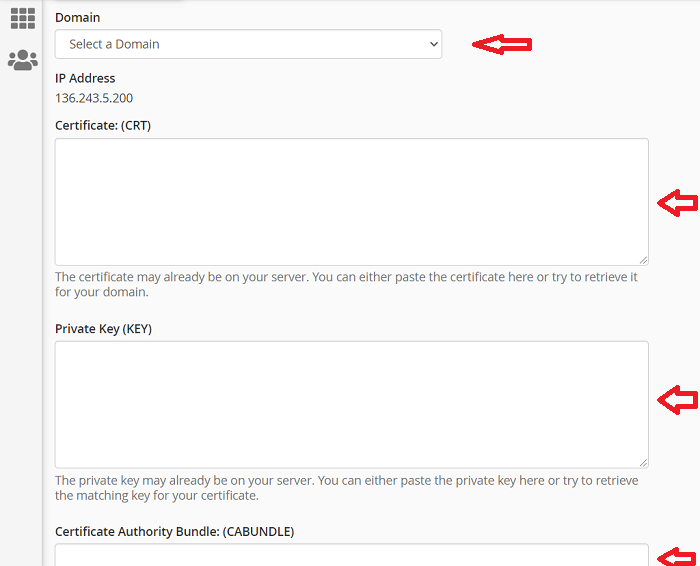
- Now, copy your certificate into appropriate boxes.
- Once you have pasted certificate files in required boxes, you need to click on the ‘Install Certificate’button.
Step 4 - Enable SSL certificate on WordPress Website using Plugin
When it comes to WordPress, there is a plugin available for almost anything that you wish to do on this platform and the same goes for installing SSL certificates. However, WordPress plugins always come with the risk of potential malware because these are created by third parties. So, we recommend that you choose one based on reviews and downloads.
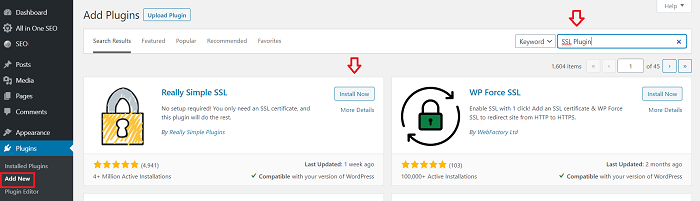
- Log into your WordPress Dashboard
- Choose‘Plugins’ option the Left-hand sidebar and click on ‘Add New’.
- Search for ‘SSL Plugin’in search box.
- You will see the number of plugins and from them click on the ‘Install’ button of the plugin which you want to install.
- Activate that plugin by clicking on ’Activate’ button.
- Finally, click on ‘Go ahead, activate SSL’button and you are done.
Conclusion:
We recommend that you should consider installing the SSL Certificate on your server through cPanel because it remains easy in use. We hope, the above-mentioned steps will help to enable/install SSL certificate on your WordPress website.